


Eye Que Review – Introduction
We all know that our eyesight gets weaker with age as this is a natural phenomenon that happens to every person. The lens in the eyes hardens, and it is natural to lose focus. Every person does not experience it, but many people do. Some people even experience pain in their eyes, while occasionally people suffer from headaches due to weak eyesight as well. And while it does seem like a task to wear glasses, we must wear them to move on with our lives.
As we grow above the age of 50, we notice a slight change in our eyesight. Having glasses with proper perception is extremely important, but for that, daily visits to the doctor are essential. But with EyeQue, this problem is also solved. EyeQue is a vision check designed to allow you to quickly check your vision using a small device and your smartphone.
What is Eye Que?
It is a personal vision tracker that turns your smartphone into a fully functional vision test without any challenging procedure. It allows you to test your vision in less than 3 minutes.
To start the test, all you need to do is attach the EyeQue Personal Vision Tracker to your smartphone and follow those instructions that appear on your screen. The test is made simple so that every person can do it. You need to adjust the green and red line using the buttons on your device so that the lines merge and form a single yellow line. The EyeQue Vision Check helps you to measure the lens power needed to correct your nearsightedness, farsightedness, astigmatism and near vision ADD. Once the test is done, you are given complete vision details and can order your glasses if you need them. It can check your eyesight multiple times before going to the doctor. With the help of this, you can prevent and diagnose disease before it even strikes.
Features of Eye Que:
Saves Tons of Time: The need to visit the eye doctor is reduced with the EyeQue Vision Tester. There is no need to take appointments from time to time to see the doctor for eye check-ups.
- It Paid for Itself Immediately:
The EyeQue is cost-effective, and it costs far less than the monthly appointments that had to be taken by you at the eye doctor.
- Trustworthy Results:
The results that are generated by the EyeQue are trustworthy, and the device is checked thoroughly by the makers.
Advantages of Eye Que Vision Tester:
- Extremely Accurate:
The Vision Tester is exceptionally accurate. The test results, which are generated by the vision tester, are accurate and up to date.
- Tests can be done in a few minutes:
With the EyeQue Vision tester, the test can be done in only a few minutes without any hassle. The device is effortless to use, and there are no lengthy procedures provided for using the device.
- Tracking Vision Overtime:
The vision tester helps in tracking the eye vision over time. The device can be used again and again to test your idea and generate accurate results.
- Comprehensive Website:
The product has a website which provides all the details regarding its usage and any query that the consumer might have. The website is easy to use by any age group.
- Order Online:
The EyeQue can be ordered online from the website without any complication.
Disadvantages of EyeQue Vision Tester:
- App Interface:
The smartphone app could be more comfortable to use as complained by the customers. Many people could not understand how to use the app.
- Annual Subscription:
The product requires an annual subscription for it to work, which is a problem for many customers.
What is included in the package?
The EyeQue vision box consists of several items that are included inside it:
- EyeQue Vision Check
- Micro USB charging cable
- Attachment strap
- Cleaning Cloth
- Papillary distance glasses and;
- A Quickstart guide
Design of Eye Que Vision Tester:
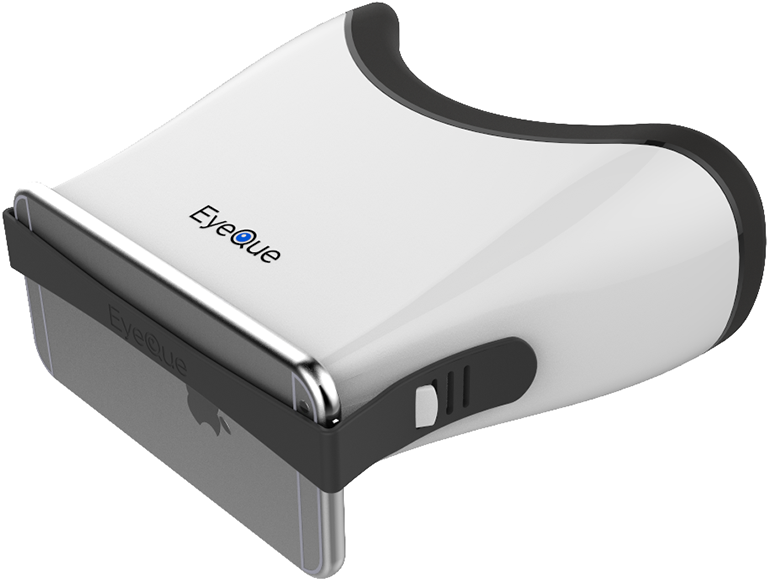
In the box of provided by EyeQue Vision Check come to an optical smartphone attachment, a safety band, PD Check papillary distance tool and a quick start guide. To use the EyeQue, you will need a smartphone running Android 4.x or iOS 9.3. Most smartphones these days meet these requirements, and they come with the pixel per inch density of 250 or more needed for the device to operate appropriately. The optical smartphone attachment is quality made. There is a silicon cup at one end against which you rest your eye when taking the test, and micro-suction tape at the other end for attaching to your smartphone. The top of the EyeQue device houses, three touch sensors are used when navigating the eye test. On the side, there is a physical power button and a charging port right next to it. To refuel, you slot the Micro USB cord into the charging port and a USB power source at the other end. A standard cable must be used rather than using a proprietary one. Those of you who tend to have a lot of gadgets often end up using the same lines for multiple devices. A full charge from zero takes about an hour and a half for the device to charge. After that, the battery will keep going for about two months with average use. This equals to around 3 hours of continuous use. A quick 15 minutes top-up is enough to achieve a 25% charge. The power button doubles as an LED indicator light. The blinking blue colour means the device is switched on. This will turn into a solid Blue when Vision Check is paired to your phone. Blinking Red light means the battery is low; a solid Red light that it is charging and no light means the charging is complete (or that the device is off). The built-in motor means the refraction test is now automated rather than manual. This allows for faster, simpler test-taking. The company has made improvements to aspheric lenses to allow increased visibility, greater accuracy and quicker test experience by the EyeQue.
How does it work?
Firstly, as we have all experienced this, we all have to sit behind a big machine for an eye check-up wherein you have to see a barn or balloon from a distance.
The machine that is placed there is called the Auto-Refractor that shines a light into your eye and immediately adjusts the focus to assess the shape and size of your cornea, which is provided to the doctor with a prescription. What this device does is the complete opposite of what an auto-refractor does. All you have to do is remove your glasses and check one eye at a time. With nine steps included, you have to overlap a red and green bar by clicking on the buttons on the Vision check device until the bar turns yellow. When you are done with testing one eye, you will have to repeat the same process with the other. After all the tests are done, you are provided with the prescription.
There is no time limit attached to this test, and for some, it may work quickly, while for the others, it might take a little bit of time. However, before the glasses are ordered, you have to take a PD test, which stands for papillary distance or the distance between your pupils. To check your PD, you have to use the Vision Check app, and they will do the job for you by scanning your face.
The product comes in the form of a portable device and is relatively easy to use. Also, it is much more cost-effective than a visit to the doctor every time.
Setup of the Device:
After purchasing EyeQue, which comes with an all-access membership for one person, the annual subscription has to be bought. You can also include your family members at an additional cost. You will need to create an account for using the first time. After downloading the EyeQue vision check app on your smart phone, you create your account and answer a few basic questions. It is recommended to take a few practice tests before taking the official test. At first, it might seem complicated, but after some time, it will become more comfortable to use. To conduct the measurement, the first click on the tab in the app, switch on the Vision check and click start. The blue light on the EyeQue device will start blinking and then tap on the scan button and select the device once it locates. You will know once it is paired. You can then conduct the tests multiple times without any issues. Then you physically attach the vision check to your smart phone screen in the middle of the indicated area. Secure with the rubber safety band. The touch sensors should be facing upside and then turn up the volume on your smart phone for full audio instructions. You will first need to administer a refractive error test for your right eye, then your left eye. From a reading distance, slowly move Vision Check towards you until it touches your eye. You should see a red and a green line when looking through the thing. Keep your other eye open focused on an object in your immediate surroundings. It’s difficult at first, but later it becomes effortless. The main goal is to overlap the lines until they change to a solid yellow. To move the lines towards or away from each other, use the sensors at the top of the device. You will hear a noise which the motor is turning on. Once done, simply click the next button and two more lines will be there but at different angles. To finish the test, you have to do this nine times. And then again you do the same thing but for the other eye. After doing it a couple of times, it will not take more than 5 minutes to do this test. It takes full of three eye tests to get your first Eyeglass number. After then, you use PD Check to measure papillary distance. This is simple to do. The tool comes in the form of a glassless pair of frames. You put them on, align the edges, so they fit just inside the oval outline pictured on your smart phone, and take a selfie.
Conclusion:
EyeQue is a worthy product, and it saves a lot of money and time. The product is cost-efficient and generates accurate results. It helps in keeping your energy by cutting down your visits to the doctor. It is a cheaper device and provides valid prescriptions. It is a recommended device. It gives all the details regarding the setting up and also the usage of the device. It comes with a warranty and then you have to take an annual subscription. It is a must buy.